
Tring (2012)
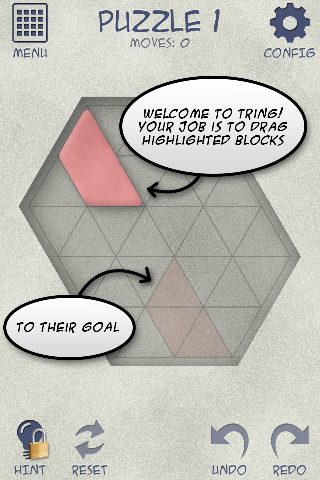
I worked on Tring for most of October, 2012. Tring is similar to standard sliding block puzzles like Blockhead, Unblock Me, Blue Block, etc. The main difference is that Tring operates on a grid of triangles, rather than a grid of squares. This means that blocks can move along three axes, have interesting interactions, and fit much denser puzzles in the same space.
This was my first use of in-app purchases in a personal project. The initial game and starter pack are free, and users can buy additional level packs if they like the game. I also allow users to purchase keys that can be used to unlock hints if they get stuck.
As a programmer, operating on a triangular grid creates a lot of challenges. I thought it might be interesting to some people to read about the methods used to create the game.
Modeling the Grid
Modeling typical sliding block movement on a 2D cartesian grid is straightforward, mainly because blocks only have two axes of movement (the native X and Y axes).
On a triangular grid, one axis is skewed and a third axis of movement is introduced, even though objects still only exist in a two-dimensional space. So we need an efficient way to model spacial position of a triangle inside this three-axis, 2D space. We also need to make sure we can these translate triangular grid coordinates back to screen coordinates.
I used a hybrid coordinate model. To start, take a standard grid and shear the vertical axis 30 degrees. This makes a grid of parallelograms that is congruent to a normal cartesian grid. Each of those parallelograms can then be bisected into two equilateral triangles. So each triangle now has an X,Y coordinate from the parallelogram it belongs to, and an additional orientation coordinate (pointing up or down). In my code, I label this space (row, column, orientation).
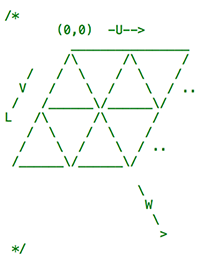
In Tring, a block is composed of three or more linked triangles. A block can lie on one of three axes, labeled U, V and W. The U axis lies along the original parallelogram’s X axis. The V axis lies along the original parallelogram’s Y axis. The W axis lies on the new angle used to shear the parallelograms in half. Here’s a visual aid from my code comments:
The (row, column, orientation) system is great for spacial modeling, but in Tring we also need to know how blocks will interact with their neighbors (and walls). Specifically, is there a block, or wall, in the neighboring triangle along the axis of movement? If so, would dragging one block cause the next one to slide, or is the push illegal?
For this task we compress the coordinate into a single integer, so that each triangle is represented by one index value. I chose an arbitrary limit to the grid: 16×16 parallelograms, or 32×16 triangles. Thus, each triangle’s integer index value is [(row << 5) | (column << 1) | orientation]. So it’s really just a 1:1 mapping between (row, column, orientation)->(index), but it works because of the limited 16×16 parallelogram grid. This type of mapping breaks down on an infinite grid.
Here’s another visual aid from my comments:
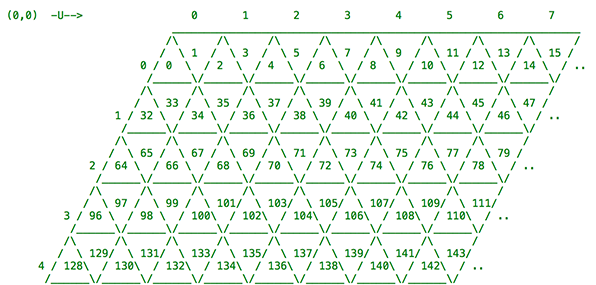
There are three axes, so six directions of movement. But given this grid, it’s fairly straightforward to create a function that will take a triangle index and return the neighboring index along any given axis/direction (just add or subtract a certain number). I also added a parameter to this function to ask for either the immediate edge-neighbor, or the next triangle along the axis with the same up/down orientation.
That function, along with a few helper functions to deal with blocks occupying multiple triangles, were really the heart of the hit detection and block movement system.
Collisions That Push
So basic collision detection is simple. If we know the triangle that a block is pushing from, and we know the direction, we can check the next two triangles it will slide into (the edge-neighbor and the tip-neighbor) to see if they’re occupied. If they’re walls, we can’t move at all. If they’re occupied by a block, it’s a bit more complicated.
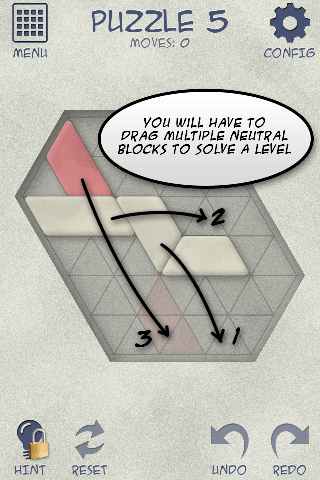
If the block movement indicated by the “1” arrow occurs, that middle beige block will “push” the rightmost block out of the way (along the U axis) because of the angle between them. Note that if the movement indicated by the “2” arrow occurs in that position, the movement is stopped because the leftmost block cannot push the middle block along that axis.
Of course, the movement by the “1” arrow is only legal because the rightmost block has the freedom to slide right. If the rightmost block was next to a wall, the middle block would be unable to push it, and thus unable to move itself.
This behavior creates a complex chain, in which one block can push multiple blocks, and those blocks can each push multiple blocks themselves.
The implementation is a recursive function that starts with the block being propelled by the user’s finger. For each block:
- Check if it will hit a wall. If so, return an empty array.
- Check if it will proceed into an empty triangle (no pushing). If so, return an array containing the block in question (each array element also contains the axis it will slide in).
- Otherwise, it will be pushing into one or two blocks. Check that the angle is appropriate for pushing. If not, the push is like running into a wall, so return an empty array. If the push is legal, run the function on each block we can push.
- If any blocks return an empty array, the push is illegal at some point down the chain, so return an empty array. If all blocks return non-empty arrays, join the arrays and add the current block, then return that one larger array.
In the end, we get back an array that contains all of the blocks that will be pushed, and the direction they will travel. Since movement of all blocks is proportional, we can interpolate the position of all pushed blocks based on the position of the block propelled by the user’s finger.
Drawing the Puzzle
Let’s quickly go over one helper function. This is how we determine the center of a triangle in a regular unit cartesian grid, given its triangle index (tri):
ret.x = TRI_COL(tri) - (TRI_ROW(tri) * 0.5) + (TRI_ORI(tri) * 0.5);
ret.y = (TRI_ROW(tri) * (SQRT_3_F / 2.0)) +
        ( (TRI_ORI(tri) == TRI_ORIENT_UP) ? (SQRT_3_F / 3.0)
                                          : (SQRT_3_F / 6.0) );
For X, each column adds 1, and each row decreases 0.5 because of the sheared angle. Then add an additional 0.5 if it’s the downwards-oriented triangle of the parallelogram.
For Y, each row adds (√3)/2 (the height of a 30/60/90 triangle), then we have to add a bit extra depending on the orientation of the triangle.
Each puzzle lies somewhere in the middle of a 32×16 grid of triangles, where each triangle is either a wall or non-wall. Because the puzzle can be arbitrarily shaped, we need to figure out how to center the non-wall triangles in the view. First, let’s figure out the unit height and unit width of the visible puzzle:
for (int tri = 0; tri < MAX_TRIS_PER_LEVEL; tri++) {
  int row = TRI_ROW(tri);

  // Skip walls
  if (levelState->_tris[tri].wall) {
    continue;
  }

  // Height
  if (row < firstVisibleRow) firstVisibleRow = row;
  if (row > lastVisibleRow)  lastVisibleRow  = row;

  // Width
  CGPoint center = CENTER_COORD_OF_TRI(tri);
  if (center.x < cenOfLeftMostTri) {
     cenOfLeftMostTri = center.x;
     leftMostTri = tri;
   }
   if (center.x > cenOfRightMostTri) {
     cenOfRightMostTri = center.x;
     rightMostTri = tri;
  }
}

// Calculate unit sizes
float unitHeight = (lastVisibleRow - firstVisibleRow + 1) * SQRT_3_F / 2.0;
float unitWidth  = (cenOfRightMostTri - cenOfLeftMostTri) + 1.0;
We also need to determine how many horizontal edges fit inside that absolute width:
// Normalize to upside tris
int colRM = TRI_COL(rightMostTri);
int rowRM = TRI_ROW(rightMostTri);
int colLM = TRI_COL(leftMostTri);
int rowLM = TRI_ROW(leftMostTri);
if (TRI_ORI(rightMostTri) == TRI_ORIENT_DOWN) {
  rowRM--;
}
if (TRI_ORI(leftMostTri) == TRI_ORIENT_DOWN) {
  rowLM--;
}
float numHorizEdges = (colRM - colLM + 1) + ((rowLM - rowRM) * 0.5);
Finally, Calculate the actual length of an edge in screen coordinates, and the origin delta needed to shift the puzzle into the middle of the screen:
// Inset the grid by one edge unit
unitHeight    += 1;
unitWidth     += 1;
numHorizEdges += 1;

// Screen size we need to fit into
float actualMaxW = displaySize.width;
float actualMaxH = displaySize.height;

// Aspect ratios
float actualAspect = actualMaxW / actualMaxH;
float gridAspect   = unitWidth  / unitHeight;

// Determine which is wider, screen or puzzle
if (gridAspect > actualAspect) {
  edgeLen = actualMaxW / numHorizEdges;
  yhint = (actualMaxH - (edgeLen * unitHeight * 0.5 * SQRT_3_F)) * 0.5;
  xhint += edgeLen * 0.5;
} else {
  edgeLen = actualMaxH / unitHeight;
  xhint = (actualMaxW - (edgeLen * numHorizEdges)) * 0.5;
  yhint += edgeLen * 0.25 * SQRT_3_F;
}

// Origin
origin->y = yhint - ((0.5 * SQRT_3_F * edgeLen) * firstVisibleRow);
origin->x = xhint - (cenOfLeftMostTri - 0.5) * edgeLen;
Now that we have the origin and edge length, we’re fully equipped to draw the puzzle at the right place with the right size!
Drawing Blocks
Most of the actually puzzle graphics in Tring are drawn programmatically. I don’t have any image resources for the walls, grid, or blocks themselves (other than a big square texture image). It was a lot of up-front work to get all of the equations correct, but it let me quickly change the look and feel of the game without importing new graphics for everything.
One of the tricky parts was getting the subtle round corners on all of the blocks. I found my page of notes while thinking about the trigonometry involved:
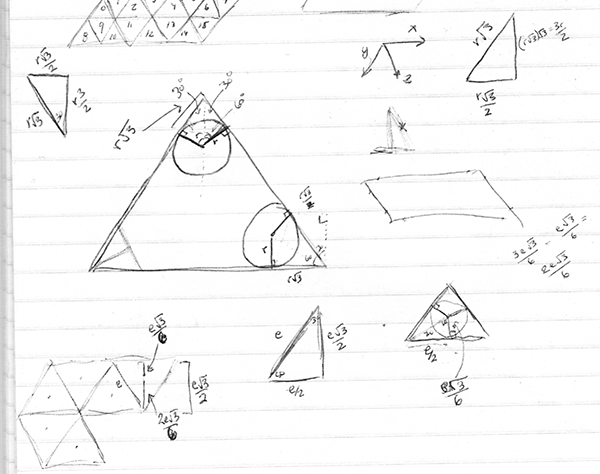
The basic idea is that we take a circle of radius R nestled into the corner of the triangle, and we need to determine the coordinates of where the circle lies tangent to the sides of the triangle. Because these are all 30/60/90 triangles of various sizes, it’s fairly easy to find each distance. There’s just a lot of different distances to track. So wrote a little data structure that would dynamically calculate and store all of the various relative coordinates of a rounded triangle based on edge length and circle radius.
Once I had this legend of coordinates for a triangle, I had to actually draw the outline of a block. Rather than making one algorithm and rotating/flipping, I chose to simply make 12 different path functions (even/odd length three axes two orientations) that would give me a CGPathRef. Each path had it’s local origin at the center of the first triangle in the block it was representing, and was drawn with a combination of CGPathAddLineToPoint and CGPathAddArcToPoint.
Once I had a CGPathRef that outlined a block, the drawing algorithm was:
- Set the clipping path to the block path
- Draw the block texture with a random offset (so each block looks a bit different)
- Draw the highlight color (transparent so the texture bleeds through)
- Create an “outer” path by adding an infinite rectangle to the block path
- Set a white shadow and do an EOFill on the outer path (creating the lighter side of the bezel)
- Repeat for the black shadow of the bezel
- Finally, stroke a thin around the path for the border
Repeat that for all the blocks! The shadows of the blocks (that lie on the floor) are actually separate UIViews that follow the blocks, but lie below the wall layer in the view hierarchy (so they don’t get drawn over anything).
Level Solver
Having a fast and memory efficient level solver was critical. Not only is it required for a random level generator, but I knew I wanted a dynamic hint function in the game. It would have to operate quickly given the speed and memory limitations of the iOS device it was on.
Fortunately, the only difference between any two states of a level is the block position. The walls and goal spaces never change, nor do block size/axis orientation. Because the grid is 16×16 parallelograms, and we limit each puzzle to 16 blocks, we can represent every level state with a single 64-bit integer (since each block slides on one axis, it can only be in 16 possible positions – 4 bits. 16 blocks x 4 bits = 64 bits.)
Because we’re looking for the fastest solution, we’ll perform a breadth-first search through the movement tree. This might have been a bad idea if there were hundreds of thousands of possible positions, but it turns out that the smallish size of the puzzle boards (and the fact that blocks prevent other blocks from moving too far) really limits the total solution space.
So we plop the starting state at the head of the queue and being a simple iteration that continuously acts on the head of said queue:
- Check if we have a solution. If so, we’re done!
- Find every possible child position (for each block, determine every space it can move to.)
- A separate AVL tree caches every state we’ve already visited. If a child state isn’t in this AVL tree, add it to the tree and push it on the solution queue. The child state points to its parent state. If the child was in the AVL tree, it’s already been visited, so ignore it.
Once we find the solution, we know it’s the fastest because of the breadth-first nature of the search. We can then parse up the parent pointers node by node to see the solution (and calculate the solution depth).
Generating Levels
The game needed hundreds of levels, and to make them by hand would have been a nightmare. So I built a level generation tool into the app.
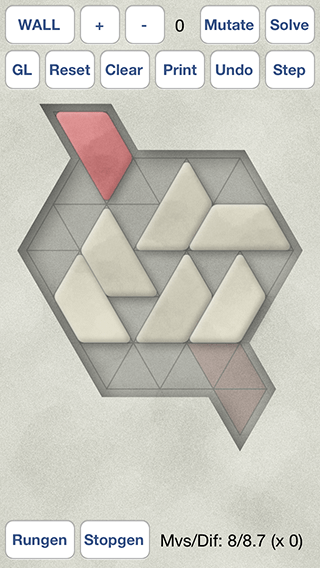
The tool had all of the little widgets I needed to modify a level. Based on the mode (wall, goal, drag), tapping on the puzzle would do various things to edit the triangles. I could resize, move, add and delete blocks. For any given position I could run the solver to check it’s difficulty and see the solution in progress.
I also wrote a naive/greedy mutation algorithm that would run a number of trials, randomly adding/removing a certain number of blocks each trial, and then return with the trial that had the hardest solution. Running this over and over with various parameters would create levels of all different difficulty levels. It came up with some really nasty expert levels that could take over 50 moves to solve.
Finally, I wrote the “GL” function to generate wall/goal layouts. It would randomly place highlighted blocks and goals, then mutate empty spaces around them into different shapes. It wasn’t fantastic, but I could keep tweaking the parameters and tapping that button until I found a layout I liked, then run the mutation algorithm over it a few times to create some new levels.
Over two days I generated and curated nearly a thousand levels into the puzzle packs. Alcohol was involved.